Azure Bastion - A real life use case
I am currently working with a customer that has massive restrictions on how they can access resources, not only from their office WAN, but also from their laptops. To mitigate some of the strict controls around accessing resources in Azure, we found out at the beginning of the project that most connections from their own WAN were denied. They do not have an ExpressRoute deployed, nor a VPN. We needed to find a way for them to connect to their virtual machines running in Azure. We did find that HTTPS (port 443) is allowed.
We moved our project offsite to avoid the WAN connectivity issues as it was just completely stalling our ability to connect to anything (including various websites like GitHub, Azure DevOps, etc), but there were still limitation on their machines themselves to disable SSH and RDP access to their VMs.
Instead we launched the Azure Portal and used Bastion for their access, solved!!
I am going to walk through how to configure Bastion and some gotcha’s that we noticed.
What is Bastion?
Bastion is a PaaS (Platform as a Service) offering that allows you to connect to your VMs running in Azure over SSL. It removes the requirement to use RDP or SSH. While RDP/SSH are the go-to methods of connecting to your workloads, it also opens up your VM to a more penetrable attack surface. Years ago, I heard that the largest attacks in Azure are on RDP/SSH ports, so this is the solution to gaining single server access without exposing your workloads to high risk attacks.
Bastion works by creating a subnet within your vNET and exposing itself as you would a traditional jump host. Since this is a PaaS service you don’t have to manage a VM and all the headaches that go along with it (patching, backups, etc). The Bastion service is built and designed to withstand attacks and can be deployed into your perimeter network (DMZ) or into a specific vNET.
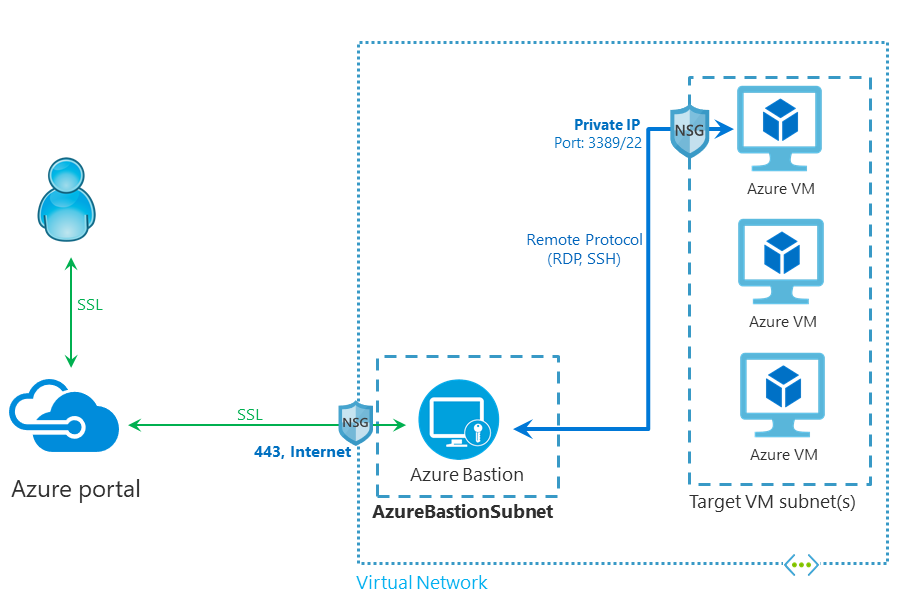
Once deployed, an end user will connect to the Azure Portal using any preferred HTML5 browser. The user will select the VM to connect to and with a single click (and a password input), the RDP/SSH session opens in their browser. A public IP is not required on that VM because Bastion takes the incoming request on port 443 and performs a NAT to the internal IP address of the server over ports 3389/22.
The diagram below walks you through this:
$subnet = New-AzVirtualNetworkSubnetConfig -Name $subnetName -AddressPrefix 10.10.100.0/24
$vnet = New-AzVirtualNetwork -Name "myVnet" -ResourceGroupName " myBastionRG " -Location "westeurope" -AddressPrefix 10.10.0.0/16 -Subnet $subnet
Create a public IP for Bastion (not required):
$publicip = New-AzPublicIpAddress -ResourceGroupName "myBastionRG" -name "myPublicIP" -location "westeurope" -AllocationMethod Static -Sku Standard
Create the Bastion service within the subnet:
$bastion = New-AzBastion -ResourceGroupName " myBastionRG " -Name "myBastion" -PublicIpAddress $publicip -VirtualNetwork $vnet
Wait a few minutes and your Bastion service should be deployed successfully.
Connect to a VM
Navigate to the VM that you would like access to. On the Overview page, select ‘Connect’

Practical field notes on building, shipping, and changing software systems.
© 2026 April Yoho. Built with Astro and deployed on Netlify.